How to Install Free SSL Certificate To your Google Cloud Platform.

To Know How to Setup Free Hosting on Google Cloud
To Go to the Google Cloud Service Platform Click Here.
Introduction:-
In the Blog, I am going to Show How to Install a Free SSL Certificate On Google Cloud servers Hosted Domain with an Auto-Renew Process. And I am showing you Step by step procedure for the setup and how it works If you are facing any issues. You can Contact me by clicking here. I’ll contact you within 24 Working hrs.
What Is an SSL Certificate?
The SSL Stands for the Secure Socket layer. It is a security layer or protocol to encrypt communication between web browsers and servers. It will be provided by Web Servers(Hosting providers). It is a secure layer to your Site to do Secure Transactions. Also, Some Browsers and Google do not Give access to a Site without an SSL Certificate, so SSL Certification is required for the website.

Setup SSL On Google Cloud Hosting Stepwise Procedure:
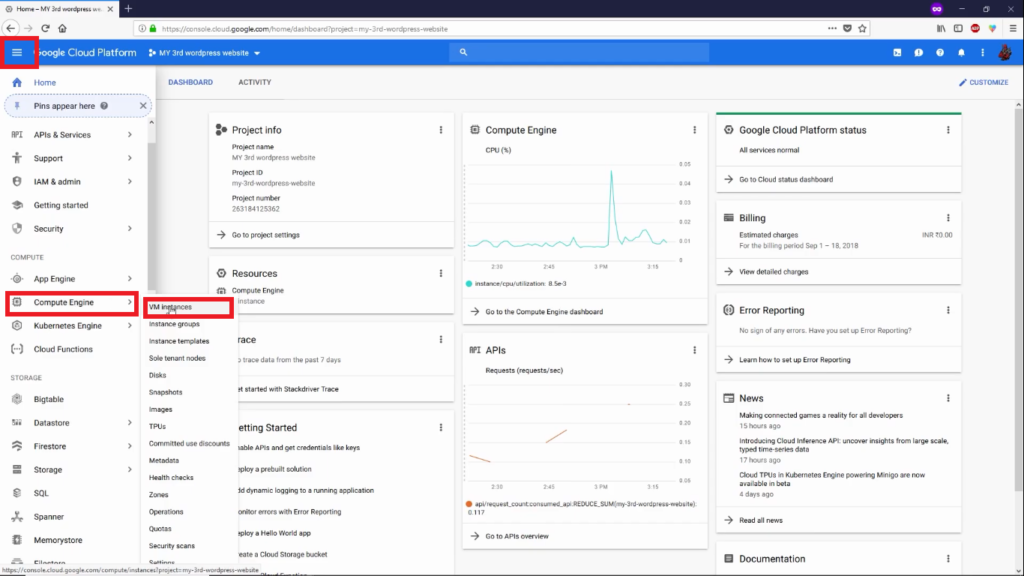
- Open the Menu -> Go to the Compute Engine -> Click on VM Instances to start the Process of SSL Certificate Installation.
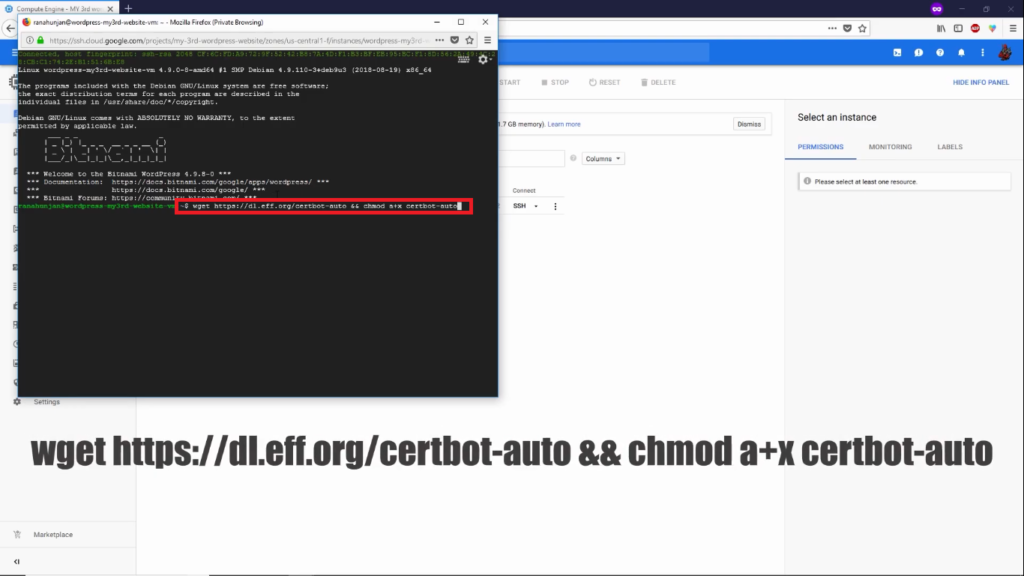
2. Click On SSH to open the Terminal for the further Process of SSL Certificate Installation.
3. Type the Command I mentioned Below for Installing Certbot to the System -> press Enter.
Command:- wget https://dl.eff.org/certbot-auto && chmod a+x certbot-auto
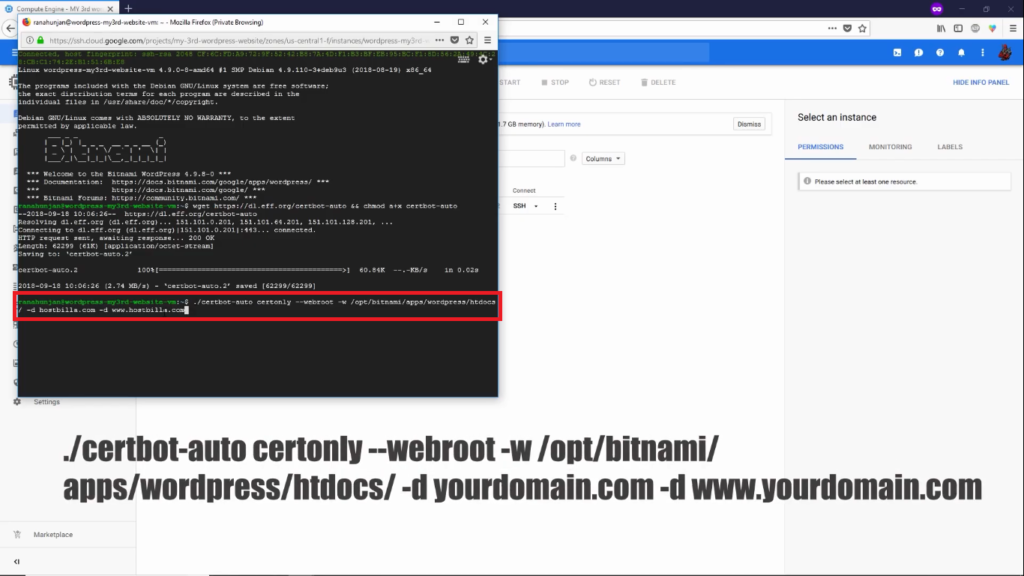
4. Now Type the Next Command or you can from Below (This Command is for generating the SSL Certificate.) -> Press Enter. (Note: yourdomain.com means which Buy form the providers Do Not USE my OR yourDomain.com Line in the Command)
Command:- ./certbot-auto certonly –webroot -w /opt/bitnami/apps/wordpress/htdocs/ -d yourdomain.com -d www.yourdomain.com
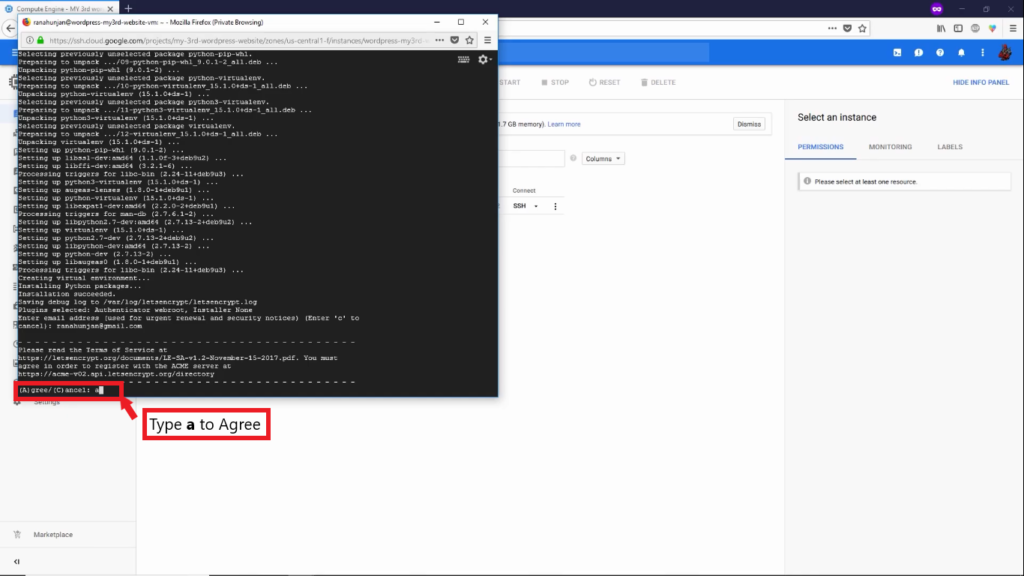
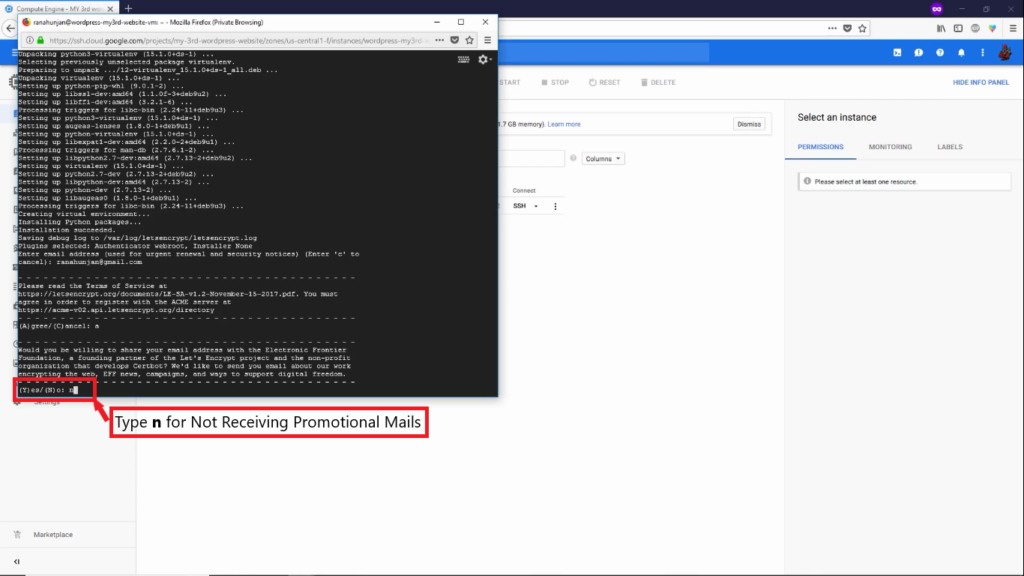
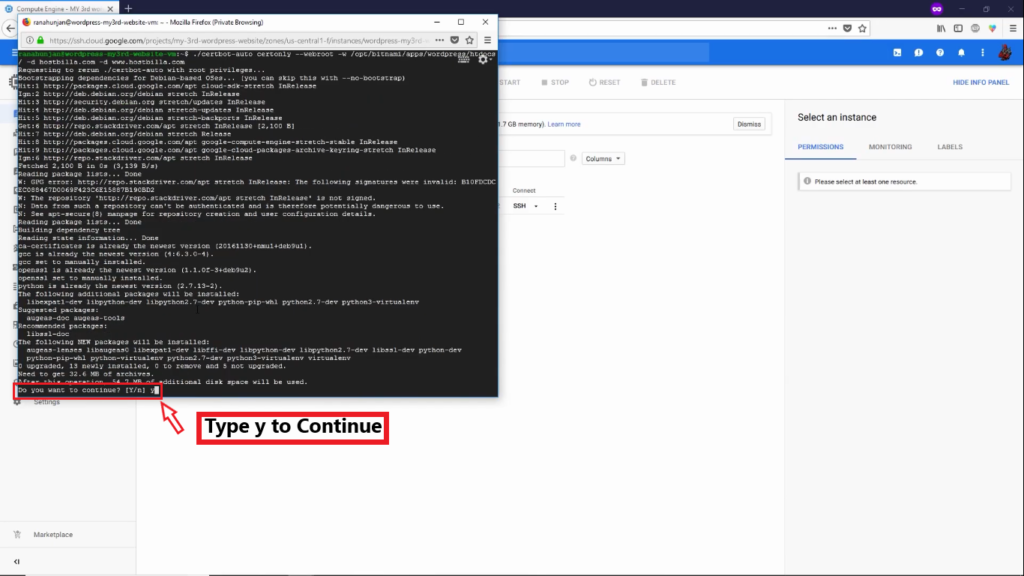
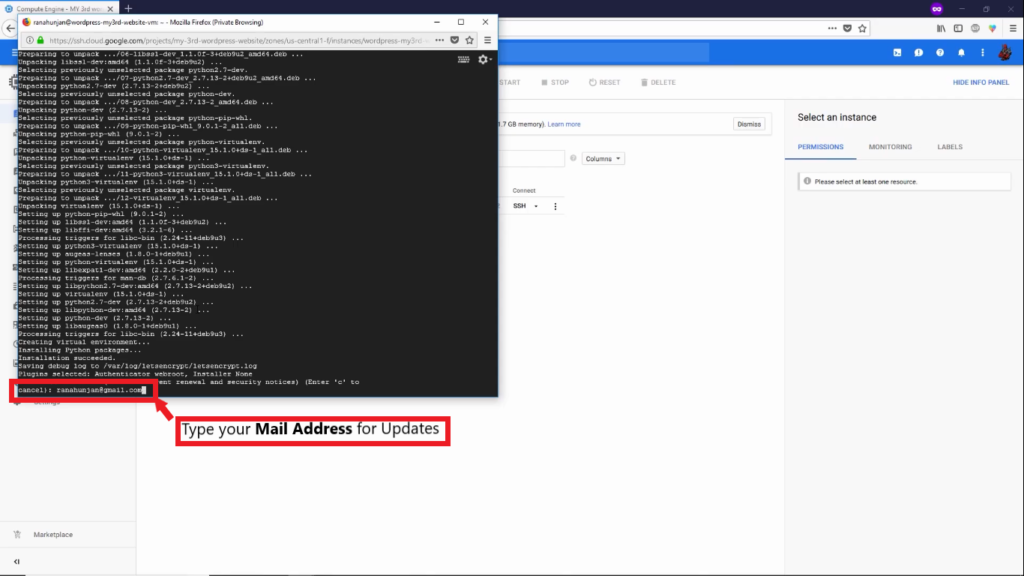
5. After the Generate Command type y for continue -> Press Enter. 6. Enter Your E-mail address For the Setup -> Press Enter. 7. Now your have to agree to terms & conditions type a -> Press Enter. 8. Press n For not receiving the Promotional emails to you -> Press Enter.


Testing Auto-Renewal Functionality
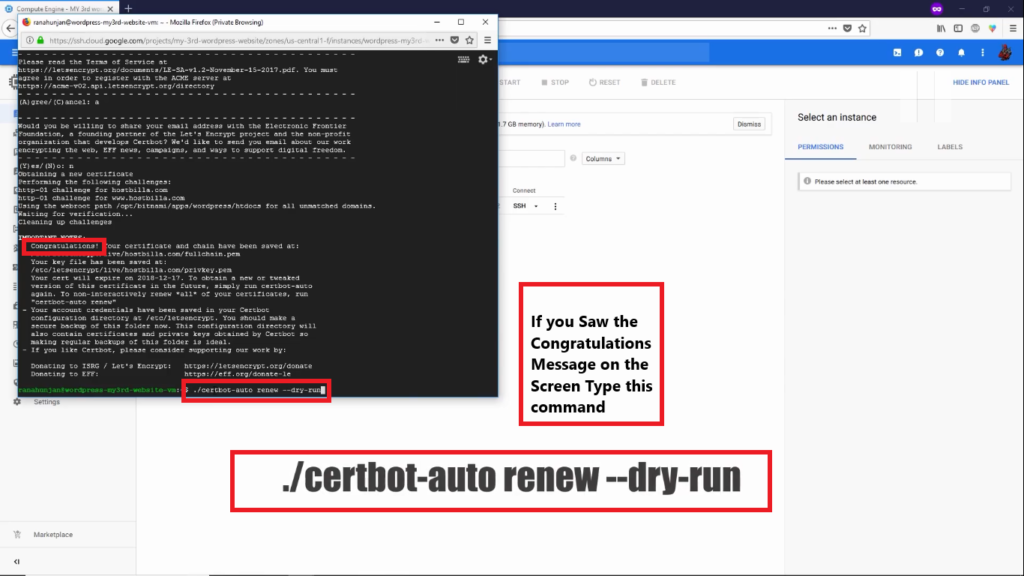
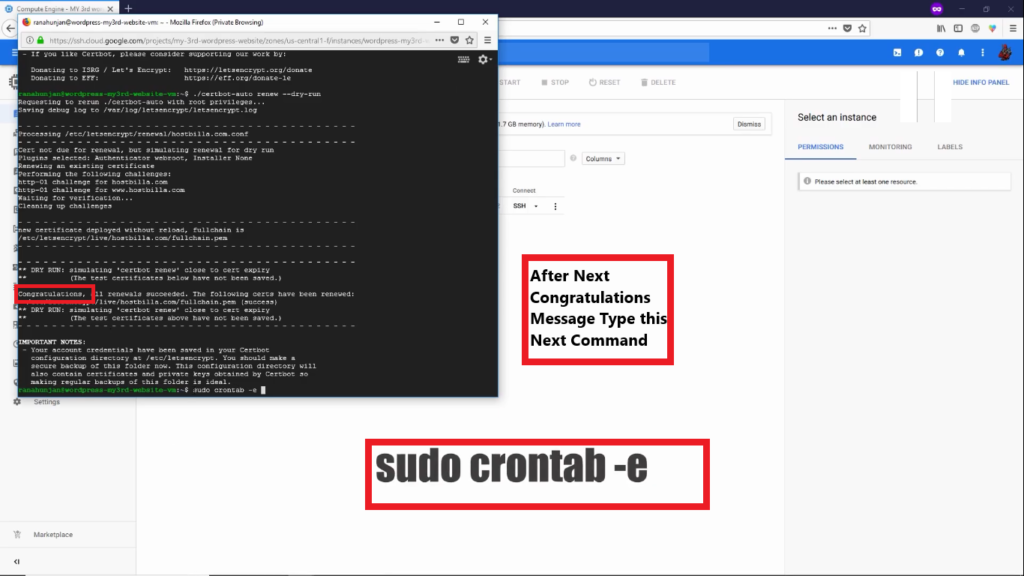
- Now you saw the message of Congratulations as shown in the below image -> type the Next Command for further process.
Command:- ./certbot-auto renew –dry-run
2. After Testing Command You’ll see again the Congratulations Message after that type the Next Command -> Press Enter. (NOTE: This Command is for the Auto-renew process.) -> then type 1 for Entering In File -> Press Enter.
Command:- sudo crontab -e
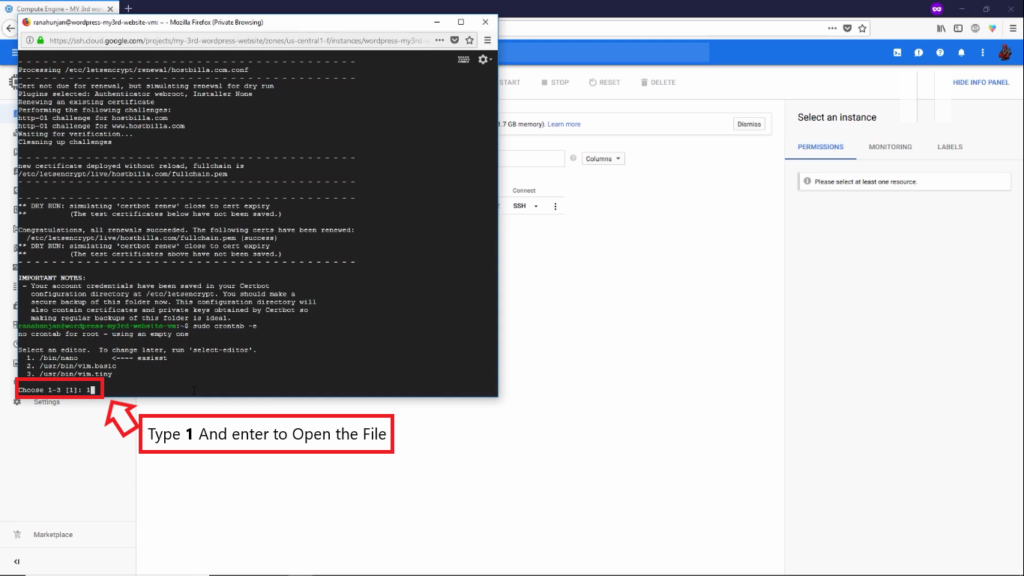
3. Type Or Copy the Commands in the file same as I showed in the image below -> Then Press Ctrl+ X -> type y to exit the file.
Command :- 0 0 * * * ./certbot-auto renew –quiet –no-self-upgrade 0 12 * * * ./certbot-auto renew –quiet –no-self-upgrade

Configure an SSL Certificate in WordPress.
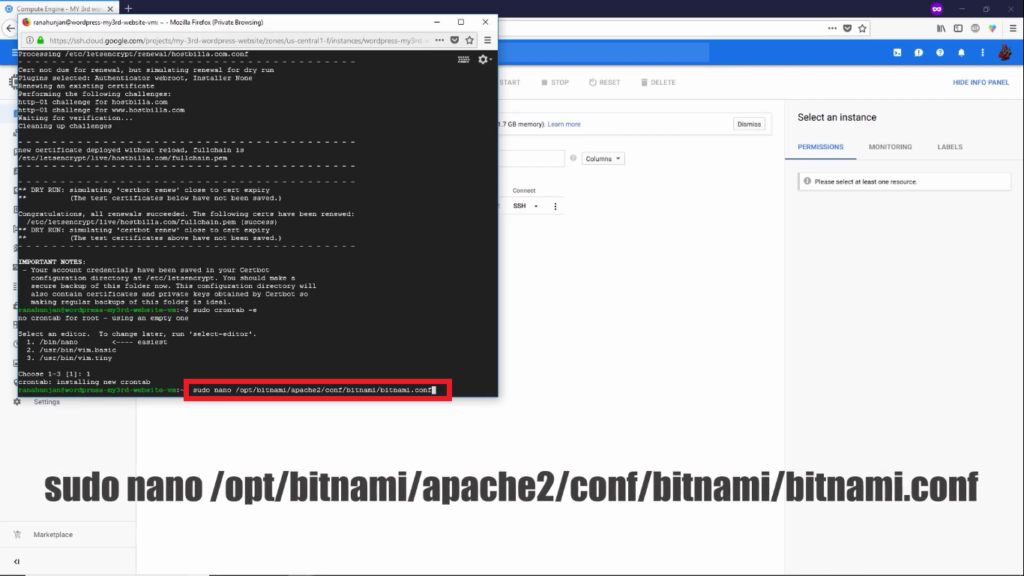
- Configuring the SSL Certificate Type the Command for Entering in the File.
Command :- sudo nano /opt/bitnami/apache2/conf/bitnami/bitnami.cong
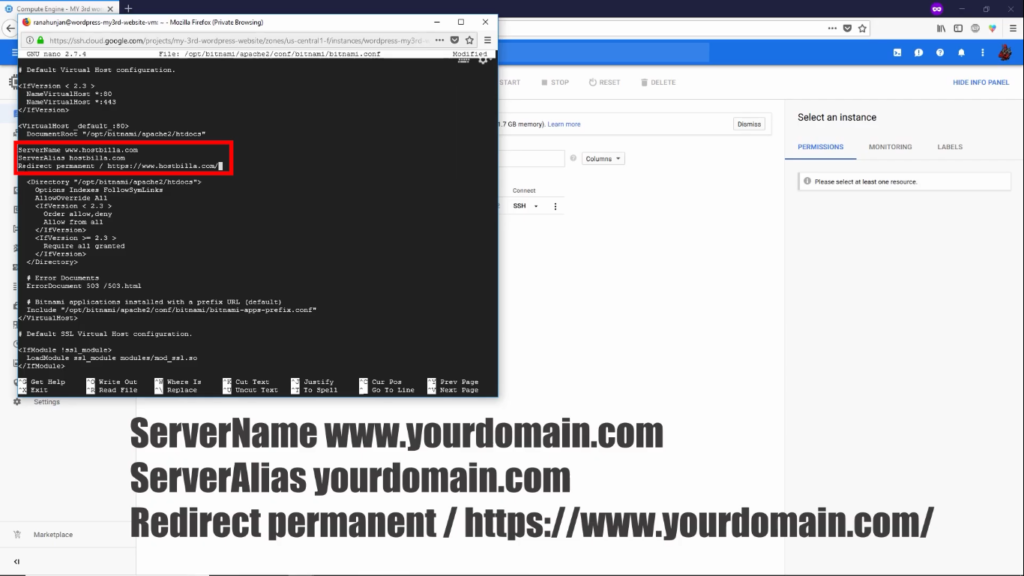
2. In this File Scroll Down under the VirtualHost _default_: 80 -> Type the Commands OR Copy the Commands from below as shown in the image. (Note: Do Not use My Domain Name Use Your Domain Name.)
Command :- ServerName www.yourdomain.com Serveralias YourDomain.com Redirect permanent / https://www.yourdomain.com/
3. In the Same File Scroll Down -> In VirtualHost _default_: 443 -> Type the # Before (Ex.#SSLCertificateFile And #SSLCertificateKeyFile) -> Type Or Copy the Next Command I mention Below as well as in Image also -> After Command Pasted press Ctrl+X And press y -> Press Enter.
Command :- SSLCertificateFile “/etc/letsencrypt/live/yourdomain.com/cert.pem” SSLCertificateKeyFile “/etc/letsencrypt/live/yourdomain.com/privkey.pem” SSLCertificateChainFile “/etc/letsencrypt/live/yourdomain.com/chain.pem”
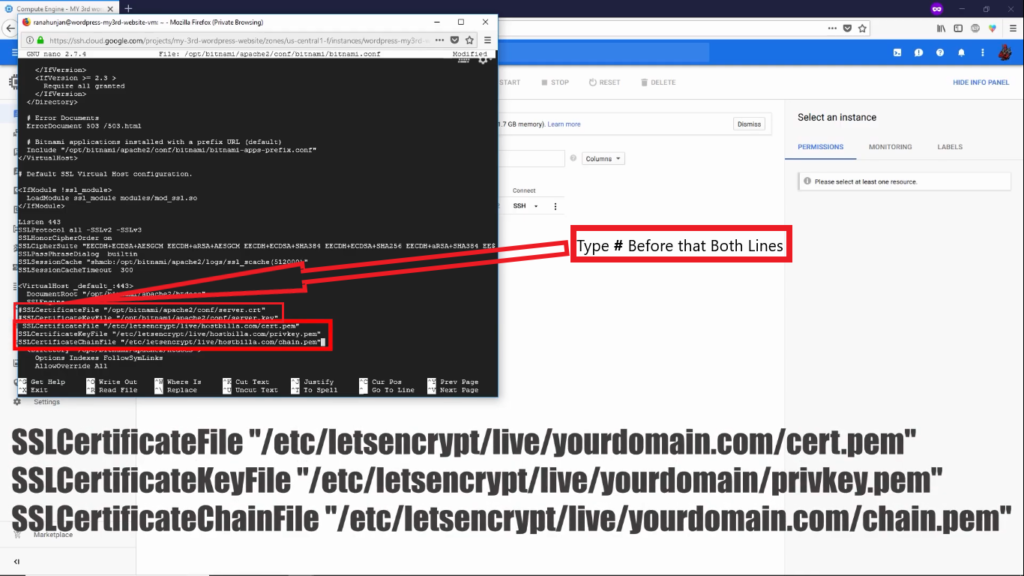
4. Next Type the Command For changing the WordPress URL from the WP Config file -> After the Command Press Enter.
Command :- sudo nano /opt/bitnami/apps/wordpress/htdocs/wp-config.php

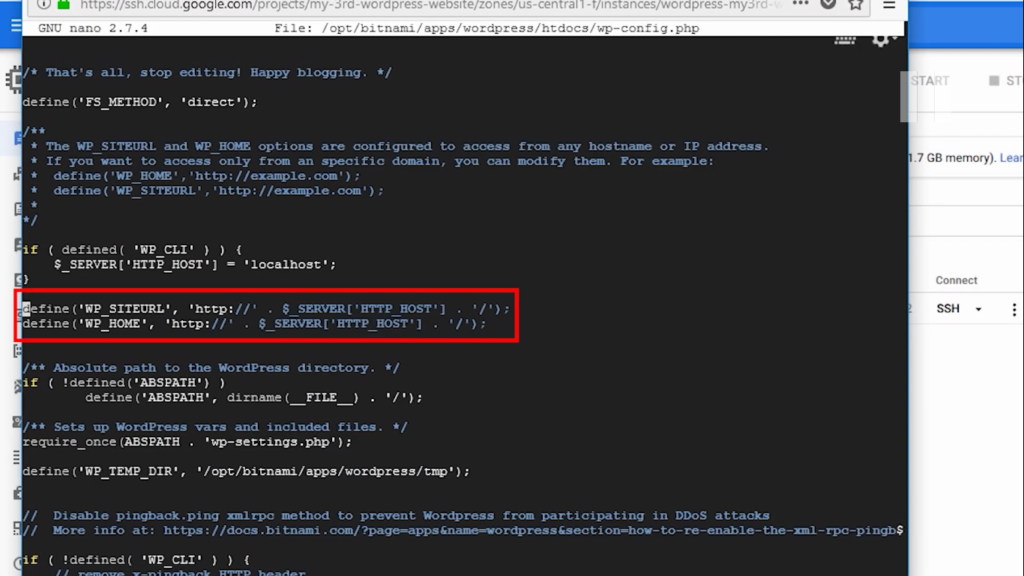
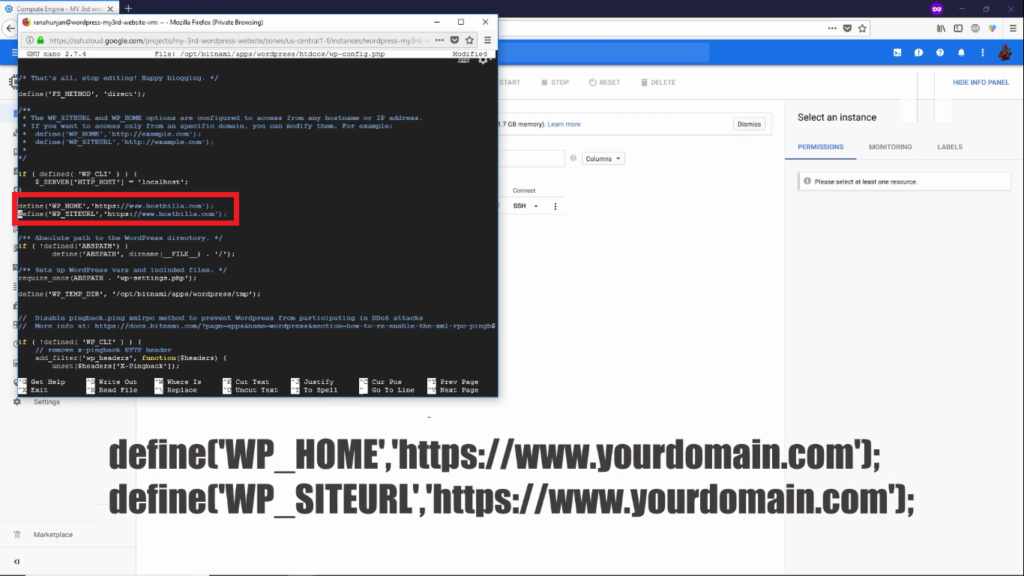
5. Go to the middle of the Code that I mentioned in the image Delete the following Command and then replace with the New One also mentioned below -> After the Command is Replaced Press Ctrl+X And type y -> Press Enter. This Command needs to be replaced Because it adds HTTPS protocol to the server And adds a secure protocol so, therefore it’s necessary to change this.
Command to Delete. :- define(‘WP_SITEURL’, ‘http://’ . $_SERVER[‘HTTP_HOST’] . ‘/’); define(‘WP_HOME’, ‘http://’ . $_SERVER[‘HTTP_HOST’] . ‘/’);
Command To replace :- define[‘WP_HOME’,’https://www.yourdomain.com’]; define[‘WP_SITEURL’,’https://www.yourdomain.com’];
6. Then We have to Restart the Apache Server by Typing the Command
Command:- sudo /opt/bitnami/ctlscript.sh restart apache.
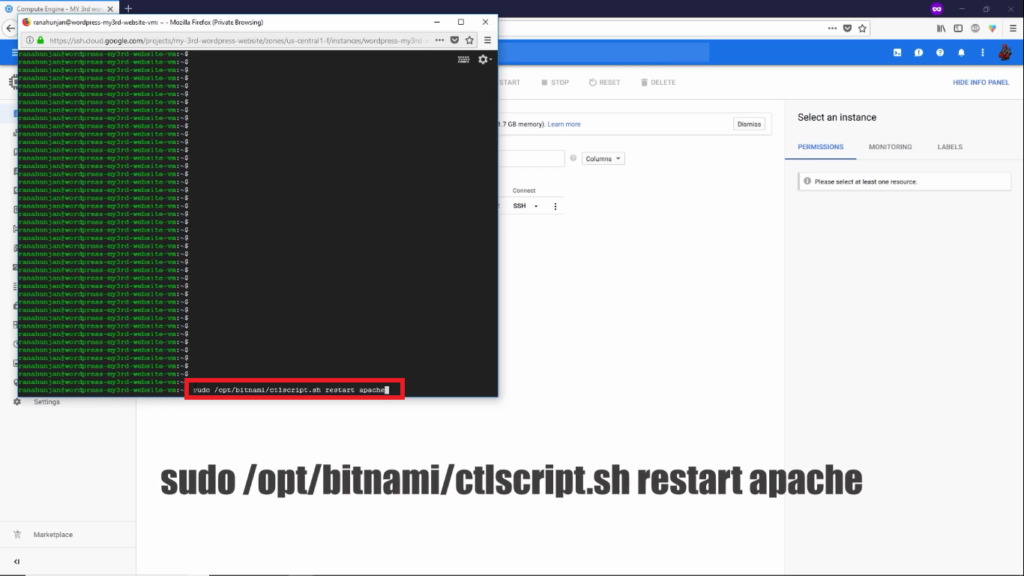
7. After the Server Restart Successfully -> Close the Terminal -> Refresh Your WebSite Or Search Your Site -> You Will see the See SSL Certificate Successfully Installed.

If You have any problem. you can Contact me by filling out the Contact Menu form or Click Here. If you like this Blog please comment below. if you have any suggestions please let me know I will Do That. Thanks, Rohit Jadhav.

Any person can download instagram videos after really reading this [url=https://www.readersmagazines.com/why-you-should-use-instagram-downloader/]article[/url]
Any person can download instagram videos after natively reading this [url=https://www.readersmagazines.com/why-you-should-use-instagram-downloader/]article[/url]
Can you be more specific about the content of your article? After reading it, I still have some doubts. Hope you can help me.
Certainly! How may I assist you?
Your article helped me a lot, is there any more related content? Thanks!
Any ëè÷íîñòü can download instagram videos after guilelessly reading this [url=https://www.readersmagazines.com/why-you-should-use-instagram-downloader/]article[/url]
Any person can download instagram videos after simply reading this [url=https://www.readersmagazines.com/why-you-should-use-instagram-downloader/]article[/url]
Any person can download instagram videos after guilelessly reading this [url=https://www.readersmagazines.com/why-you-should-use-instagram-downloader/]article[/url]